When I was first introduced to the build lights project at DiUS 3 years ago I thought to myself, that’s a nice little project to get my hands into and learn something new at the same time.
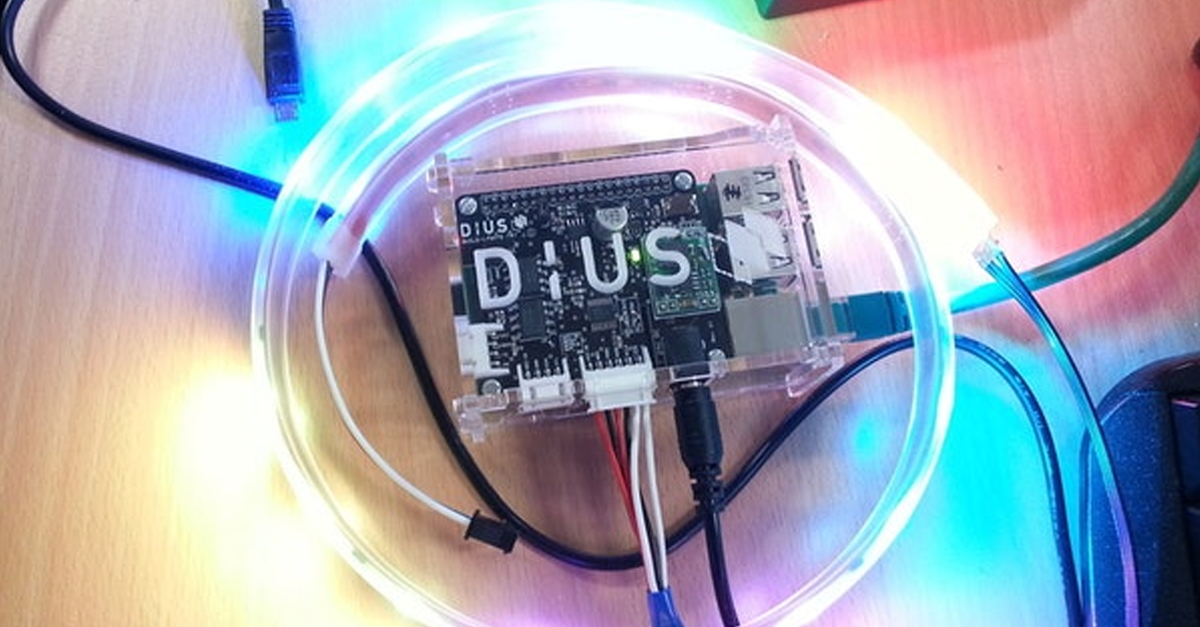
The build lights is an IoT project that provides visual feedback on monitored CI jobs. Configure your jobs and it translates the status to colours on your LED strip. It looks like this:
I setup build lights on my first DiUS project with the help of Julian Kelabora (ex-DiUS).

We instructed the team how to integrate it with their CI and subsequently went off to my next gig. However, I was never able to contribute to the source code.
That is, until last month.
You might have read the excellent two part article written by Joo Aun Saw about the great work he has done on the hardware – if you haven’t, here’s part one and part two. I spent some time with Joo discussing where we wanted to take it and agreed that the next most important feature would be to give the build lights a web interface to ease the configuration of the device itself (hostname and network configuration) and the jobs to be monitored.
Besides wanting to contribute to the build lights project, the idea of building the web interface was a great opportunity to learn a few new things. One of these things is a front end pattern I recently stumbled upon named SAM (State, Action Model) and it seems very promising instead of going with a common stack, such as React or Angular.
The high level solution
During our conversation, Joo and I agreed that the web interface would have to have the following traits:
- Be easy to use
- Minimise low level interaction with the device
- Allow for as much troubleshooting as possible
- The software should be open source
These traits are (hopefully you’ll agree) reflected in the web application below.

The architecture journey
In order to achieve the result illustrated by the screenshot above we needed a few things:
- A code hosting solution (github is our default hammer of choice at DiUS)
- A running web server on the Raspberry Pi serving a web interface
- A job monitoring tool to manage the light controller and the web interface processes
The great thing about diving into this project was the fact that the work to translate a build status into a color on an LED strip was already done. That code is written in Python and works really well so the obvious question was:
Why not expand its responsibility and use Python to run a web server as well?
The answer is quite simple: time and tooling.
Time because there was a learning curve associated with Python development (testing, libraries, web frameworks etc). Since we only had a month to get this done, we needed to leverage what we knew.
The front end solution I had in mind involved Node JS for tooling and potentially for writing the web server in Express as well. If you look at the framework closely it presents a lot of benefits:
- Ability to iterate quickly
- Able to run a small web server easily
- Modern front end tools
Node JS was really an obvious choice here. The fact that we could also leverage from internal knowledge as well was a key factor that made us pick it.
Our solution was taking shape quite nicely.

From the drawing:
- The Light Controller is responsible for the communication with the LED strip.
- Written in Python, it is responsible for the translation of the payload obtained by querying the CI server into a visual representation on the LED strip
- It manages its own JSON configuration file
- The Web Controller is responsible for providing an interface to manage the device
- Written in Node, it runs an Express server on port 80
- It manages its own configuration file and also writes to the Light Controller configuration file
- Exposes functionality to manage the device hostname, network configuration and software versioning
- The Supervisor Web Monitor (Supervisord) is responsible to for providing an interface to manage the processes
- Ability to stop, start, restart the processes
- Log tailing
The front end work
Now that we had the foundation, it was time to tackle the front end. As I mentioned above I wanted to experiment with the SAM pattern but I still needed to render the UI somehow. Something like React JS would definitely be handy because of:
- Great community support
- Wide range of tools around the technology
But I didn’t need everything that the React ecosystem provided. Furthermore the library was a about 40 KB Gzipped and I thought that was too much.
So I went on a search for a replacement and we ended up going with Inferno because:
- It provides a React-like experience
- It provides a React compatibility library to switch between the two libraries
- It’s way smaller than React (9 KB)
- It’s faster than React
I like the fact that we could ‘swap’ between the libraries and only need to write a small amount of code to make the transition. If we are ever going to do that is a different discussion but the transition appears smooth going that way.
The drawback – which is still not totally solved and is considerable – is testing. Unfortunately my favourite testing library, Enzyme, is very much React focused and I could not use it, leaving me with the only option of wiring up my own testing framework which proved to be quite an exercise.
Note: during active development the only available version of Inferno was 0.7 which did not have testing utilities bundled up with it. Since then version 1.0 has been released and seems to have a more complete set of testing features. It’s certainly worth checking it out.
The SAM (State – Action – Model) pattern
I like the SAM pattern. It is simple and powerful. Its main point is ‘the view is a function of the model’.
What that means is that anything that happens to that model could have an effect on the view – yes, SAM is a reactive pattern. SAM was thought about as a way to decouple business logic from the view. This is basically how it works:

And here is a 10 minute video of the original author explaining how everything kinda hangs together.
What it brings to the table is nothing new. Redux introduced that way of thinking but there are two key differences:
- Actions in Redux return data structures, not the data itself
- Redux is motivated by immutability, while SAM is not
The second point is the most important: SAM is founded on the principle that state mutation should be treated as “a first class citizen of the programming model.” It is OK to change it as long as there’s only one place where that happens.
The diagram above actually highlights that quite well: the only place where mutation happens is in the model module. This is responsible for enforcing rules thus accepting or rejecting the data passed in by the action as well as telling the state to render it. The model may or may not have been modified, provided the data was accepted or, respectively, rejected.
The main benefit of using the SAM pattern is its decoupling aspect: each component can be easily tested as they are only functions that take parameters.
Furthermore, its composability is very flexible. If you look into its official website there’s a section related to Composition where it shows an example with this pattern used in both the front end and the back end. It demonstrates how you could implement the components in any layer of your application which I feel enhances overall consistency and therefore maintainability.
| Client | Server | Implementation |
|---|---|---|
| View | Actions, Model, State | jQuery handlers call Actions |
Server returns HTML | ||
| View, Actions | Model, State | jQuery handlers implement actions which call present() |
Server returns HTML | ||
| View, Model, State | Actions | jQuery handlers invoke Actions, response is presented to the Model on the client |
| View, State | Actions, Model | jQuery handlers invoke Actions, response is presented to the State on the client |
Server returns JSON | ||
| View, Action, State | Model | jQuery handlers implement actions which call present(), response is presented to the State on the client |
Server returns JSON |
Table from http://sam.js.org/#iso
Coming back to the problem at hand, we knew that we wanted to build a server that would handle requests in JSON so the last 3 options from the table above were the ones we should be looking into.
We also knew that it made sense to keep the front end as lean and simple as possible and have all the model rules being enforced in the back end. Any validation errors and the server would return HTTP 500s or 400s along with a body that would be the model – before the validation happened – with an error message.
Finally having different endpoints to be invoked by the actions seemed a little cumbersome so we ended up with a single endpoint that would take a payload. The actions would live in the front end code making a HTTP call to the backend with the data appropriate for such action.
Implementing the pattern we picked was an interesting exercise. Stay with me on this next sentence:
Inferno renders the HTML based on a state representation that was based off the model retrieved via HTTP due to a browser interaction.
We decided to use Stateless – or Functional – components in Inferno which would simplify testing and avoid handling state in the components themselves. We found this decision worked ok but, looking back, I think we would be better off if we used a stateful main component and then have stateless components down the tree.
Using only stateless components meant always triggering actions that would return the entire model to be represented and then rendered. Inferno took good care of us in that aspect and the rendering was basically instantaneous. That was really good and made sense in situations where we had to save the current state after making modifications. That meant:
- Invoking a SAM action that would send a PUT request to the server (front end)
- The PUT request would persist the changes on the model and return the model (back end)
- Upon response receipt, represent that model into a state (front end)
- Pass that state representation to Inferno so it can render the component tree (front end)
What we got a little caught up on was UI interactions. In order to apply the pattern we would break our user experience with backend requests for simple show/hide interactions. We found that keeping the state representation stored in the front end using LocalStorage was a decent enough solution.
This way UI interactions would rely on this stored representation for things like show/hide and any changes to the model would rewrite the representation when the user clicked “Save”. Worked for us!
Using SAM for this type of web application was fitting. It was small enough that we could manage it properly, found a few challenges that we successfully overcome and the testing was pretty easy. The biggest win is the fact that the only extra libraries present in the front end are Inferno and lodash.findIndex. No jQuery. No Redux. Nothing too complex.
I’m still curious to see how SAM would scale in large applications but, for now, I believe it’s a decent enough pattern that brings us back to the basics of web development.
The other tech
We also used PostCSS for our CSS processing and Rollup JS for our bundling, which proved to be a successful combo and good enough experience. Here’s what it looks like:

PostCSS was indeed a great choice. The fact that you are post processing your assets changes the way you approach the bundling and the setup is definitely a breeze – PostCSS has a very good list of plugins suitable for a multitude of needs.
One negative point of Rollup is the watch feature: you have to have internet connectivity as it does a version check in order to keep watching your files. Not sure what was the motivation behind this decision but if you are not connected your bundling can hang until the connection times out.
However, what I really like about Rollup is its configuration file: very easy to reason about. On the plus side, Rollup is indeed fast, generates small files and contains what is mostly used nowadays in terms of bundling – except code splitting.
A few final words
Over the course of a month we managed to try new tech, implement a working solution that is deployed into a Raspberry Pi and provides the user a good experience in managing a piece of hardware that will provide them some visual information about the health of their builds.
This would not be possible without the collaboration of people with different skill sets, ideas and focus. Keeping the scope small while focusing on the important things are two key aspects of this project that I believe made it so successful. We are now distributing units to our clients and waiting for feedback to pour in.
We want to receive contributions from the community as well and that’s why we open sourced the software. Make sure to visit buildlights.dius.com.au in case you want to build everything from scratch.
Thank you!
A summary of features:
- Configure hostname
- Configure network (wireless / ethernet)
- Configure Continuous Integration (CI) server
- Bamboo, Jenkins, Travis, Circle CI and Buildkite for now
- Configure Jobs / Projects to monitor
- Auto discovery of jobs / projects based on CI
- Ability to choose between 2 different LED strips and specify the size of LED strip
- Reboot / Shutdown of device from web interface
- Upgrading of software from web interface
- Ability to tail logs for troubleshooting
- Ability to reorder jobs / projects
- Ability to enable or disable jobs / projects
Useful links: