

Welcome to the intriguing world of data engineering! In today’s data-driven landscape, data engineering stands as an essential cornerstone. Its role is paramount, facilitating the seamless collection, processing, and utilisation of data that underpins modern business and innovation.
In an era of rapid technological advancement, the journey to becoming a proficient software engineer is already challenging. However, the path to becoming a consultant adept in both software and data engineering is an even steeper climb.
In this blog post, we will tackle a real-world data engineering challenge. We will target the datasets via the open-sourced platform Kaggle and use the GCP services to run PySpark functions for the ETL tasks and manage the queries and results for future analytics and reporting purposes.
By the end of this project, you will gain some hands-on experience in data engineering and the confidence to start with GCP and PySpark to address more complex challenges.
Environment configurations
To get started, let’s set the stage by configuring a few essential components: the local machine, the GCP account, and the necessary tools for our upcoming tasks.
Setup Google Cloud account
Set up our Google Cloud account. If there’s already an existing Google or Gmail account, that would be fantastic! We just ensure that billing is activated by following this guide, as we will need to use a few Google Cloud services soon with the billing enabled.
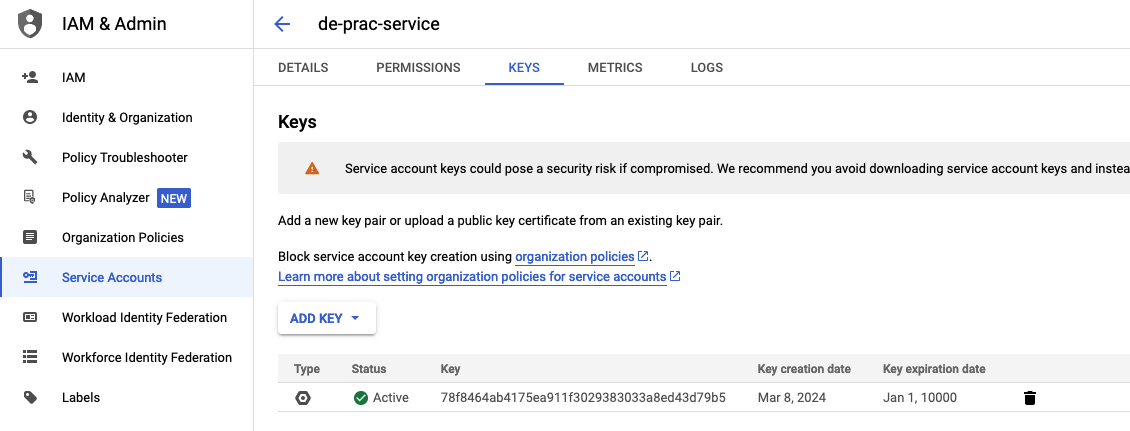
We are going to create a service account. It is a Google Cloud account associated with our Google Cloud project and not a specific user. This is an optional step as we can just use the main account, but it will be easier to manage the services of the project we create. Here’s a guide to create service accounts to enable it.
Once the account is created, we can go to the “KEYS” tab to create a new JSON key to access the account. Download the key and keep it safe on the computer.
Run this command in the terminal:
export GOOGLE_APPLICATION_CREDENTIALS=”JSON_KEY_PATH”
We also need to define the IAM roles and give the account the minimum required permission to access the required cloud services. Please add the following roles to the account:
-
- Storage Admin
-
- Bigquery Admin
-
- Compute Admin
These are the key services we will use in this example. Stay tuned as we explore each one in detail shortly.
Install Python
Install Python. It is the most widely used language for Data Science and Machine Learning.
In this blog example, we will use Python Spark (or “PySpark”) to build ETL functions to process the data. Download and install Python3 via this link. If you are a MacOS user, we can also use Home Brew to install it.
We can verify your Python version by typing the following command in the terminal:
python –version
Connect with Google Cloud
Querying massive datasets can be time-consuming and expensive without the right hardware and infrastructure. Google BigQuery solves this problem by enabling super-fast SQL queries against append-mostly tables, using the processing power of Google’s infrastructure.

The next thing we need is the Python Bigquery client library. We can find the installation details by googling it and using the pip command to install:
pip install –upgrade google-cloud-bigquery
We will also need two Google Cloud Services connectors:
-
- Cloud Storage Spark Connector. We will use Google Cloud storage (similar to AWS S3) to store the raw datasets. We can download the .jar file from this page.
-
- Bigquery Spark Connector. We can run PySpark functions to write the data into Google Cloud Bigquery datasets. Download the .jar file from this page.
Once the above .jar files are all downloaded, we have to move them to the Python installation directory under “lib -> site-packages -> pyspark -> jars”.
Sign up on Kaggle
Kaggle is a data science competition platform and online community of data scientists and machine learning practitioners. It also provides millions of free datasets for us to explore and experiment with.
Kick off the project
Congratulations! We have now set up everything we need for this example project! Let’s get started.
Picking up a raw dataset
The first step is to prepare the raw dataset that we can use to run our ETL / ELT jobs. We can go to the Kaggle website -> Datasets with the account that you’ve created and find an appropriate free dataset.

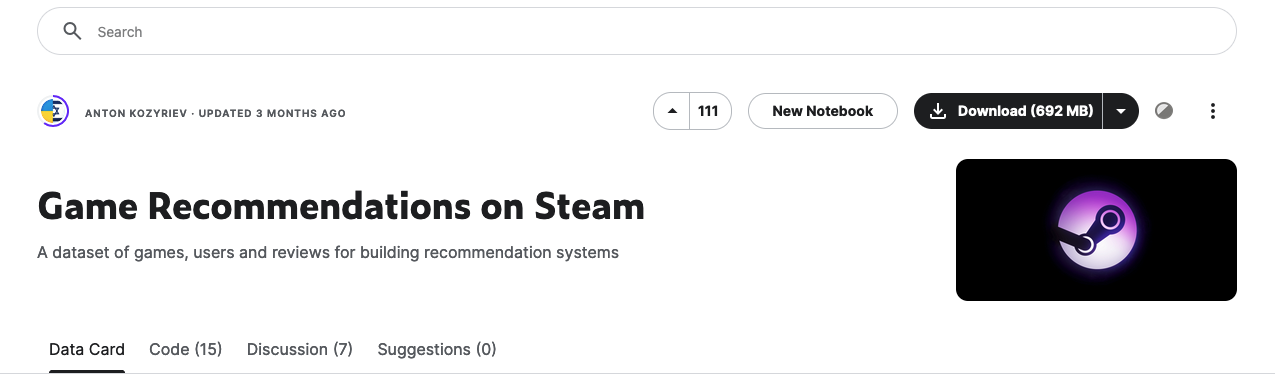
In this example project, we will choose Game Recommendations on Steam, which contains over 41 million cleaned and preprocessed data records from Steam – a leading online platform for purchasing and downloading video games, DLC, and other gaming-related content.
To process the raw dataset via PySpark on GCP Bigquery, we have to store them in a Cloud Storage bucket. There are two options here:
-
- Click the “Download” button to download the 692MB binaries from the local machine and upload them manually onto the Cloud Storage bucket.
-
- Utilise a Cloud Compute instance on GCP to download the dataset, then copy it into the bucket directly.
While Option 1 appears straightforward, it presents challenges when dealing with terabyte-level datasets or poor local network conditions. These obstacles can hinder efficiency and productivity, requiring alternative approaches for optimal performance.
We will choose the second option in this project, which offers the capability to efficiently manage large datasets with a reliable internet connection through cloud services. Additionally, this approach accelerates the process of transferring the dataset to the Cloud storage bucket, ensuring swift and seamless execution.
Transferring to Cloud
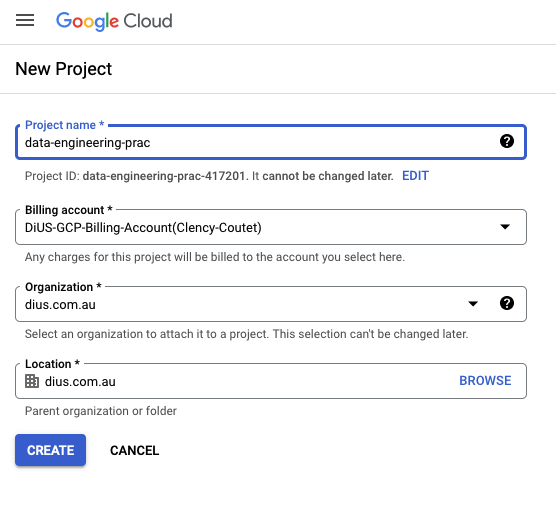
We will create a GCP project first. Go to the GCP dashboard and click “New project”, then give it a name, choose the right billing account and organisation and location:
GCP Cloud Storage
Google Cloud Storage is a managed solution tailored to storing unstructured data, akin to AWS S3 or Microsoft Azure Blob Storage. We need a cloud storage bucket to store the raw dataset files.
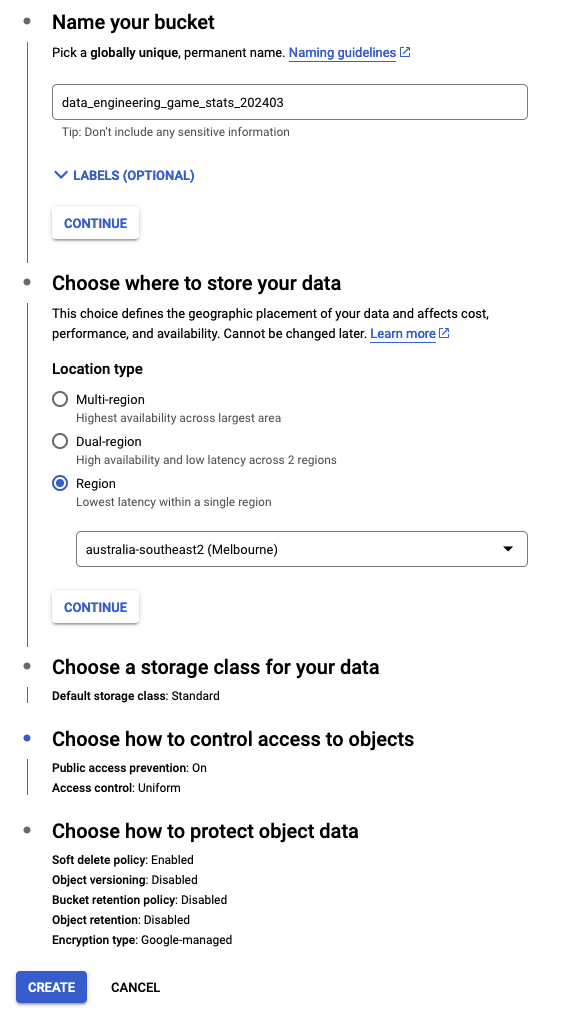
Search for “Cloud Storage” service from the top search bar and create a bucket with the following steps:
-
- Give a unique name to the bucket, e.g. “data_engineering_game_stats_202403”.
-
- To save the cost, set the location type to a single region and select it from the dropdown.
-
- Keep the reset settings as default.
GCP Compute Engine
Let’s create a GCP compute engine to download the data from Kaggle, unzip and transfer it to the bucket. We can easily spin up a VM using the high-performance, reliable GCP infrastructure.
Search for “Compute Engine” and click the button “Create instance”. Since the VM instance is mainly used for storing, unzipping and transferring the dataset for a short period of time, we only need to choose the minimum required specification with a lower cost:
-
- Give it a unique name “gcp-data-engineering-vm-202403”
-
- Select the region from the dropdown
-
- If the dataset is not too large, use e2-medium machine type
-
- Change the Boot disk size to match the downloaded dataset volume. Here I will leave it as default with 10GB
-
- Click “Create” at the bottom when all the steps of above are done
Once the VM instance is created as above, we can connect to it via SSH. We can either use the built-in SSH connection option, gcloud CLI, or the traditional SSH client to connect from the terminal.
To download the dataset files, we can copy the download URL via Kaggle and then use the `curl` command:
curl “{KAGGLE_DATASET_URL}” –output data.zip
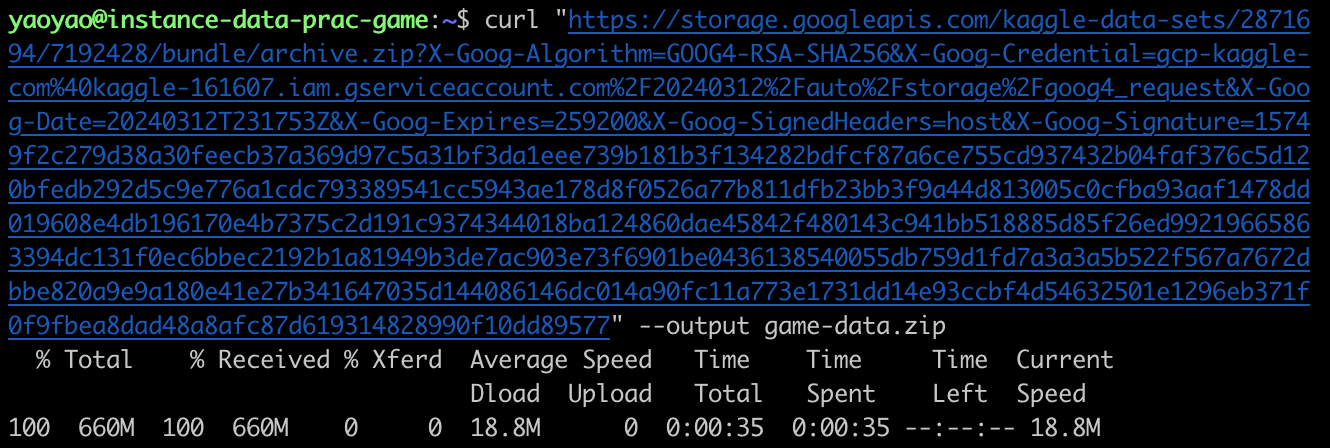
This process can take up to 10 minutes or longer, depending on the size of the dataset file. In the above example, it took me only 35 seconds to finish downloading the 660 MB file, which is 5x faster than doing it on my local machine.
It will download the dataset zip file to the current directory. However, since our PySpark functions can’t deal with the zip files directly, we need to unzip them before transferring them to the cloud storage. We can install unzip lib using the pip command and unzip the file once it is installed.
pip install unzip
unzip data.zip
We have all the unzipped files ready to be uploaded to the cloud storage. Since the Compute Engine instance comes with the built-in gsutils CLI, we can just use the following command to copy the files. We need to get the bucket URL and paste it here:
gsutil -m cp *.csv {BUCKET_URL}
Once the above step is completed without errors, we will go to the GCP Cloud Storage and the bucket to verify that the dataset files have been successfully uploaded.

ETL with PySpark
Apache Spark is an open-source unified analytics engine for large-scale data processing. Since we’ve chosen Python as our programming language, our ETL tasks will be orchestrated using the PySpark library in this project.
Let’s dive deep into the ETL functions now. Open the VS Code editor, create a new Python file “gcp-etl-spark.py”, and on the first few lines, we are going to import the required libraries for our ETL functions:
import os
import sys
from pyspark.sql import SparkSession
from pyspark.sql.types import StructType, StructField, StringType, BooleanType
from google.cloud import bigquery
from random import randint
from decouple import config
-
- Lines 1 and 2 import the Python libraries os and sys, granting access to operating system configurations and variables.
-
- Lines 3 and 4 encompass PySpark library functions and types utilised for schema creation.
-
- Line 5 initialises the Google Cloud BigQuery client.
-
- Line 6 imports the library responsible for generating random numbers.
-
- Line 7 imports the library to allow us to create local environment variables.
Optionally, we can add the following two lines to handle the multiple Python interpreters on the local machine:
os.environ[“PYSPARK_PYTHON”] = sys.executable
os.environ[“PYSPARK_DRIVER_PYTHON”] = sys.executable
We can create a Spark session with the following code, giving it an app name that we can set in a local .env file:
spark = SparkSession.builder.appName(config(‘APP_NAME’)).getOrCreate()
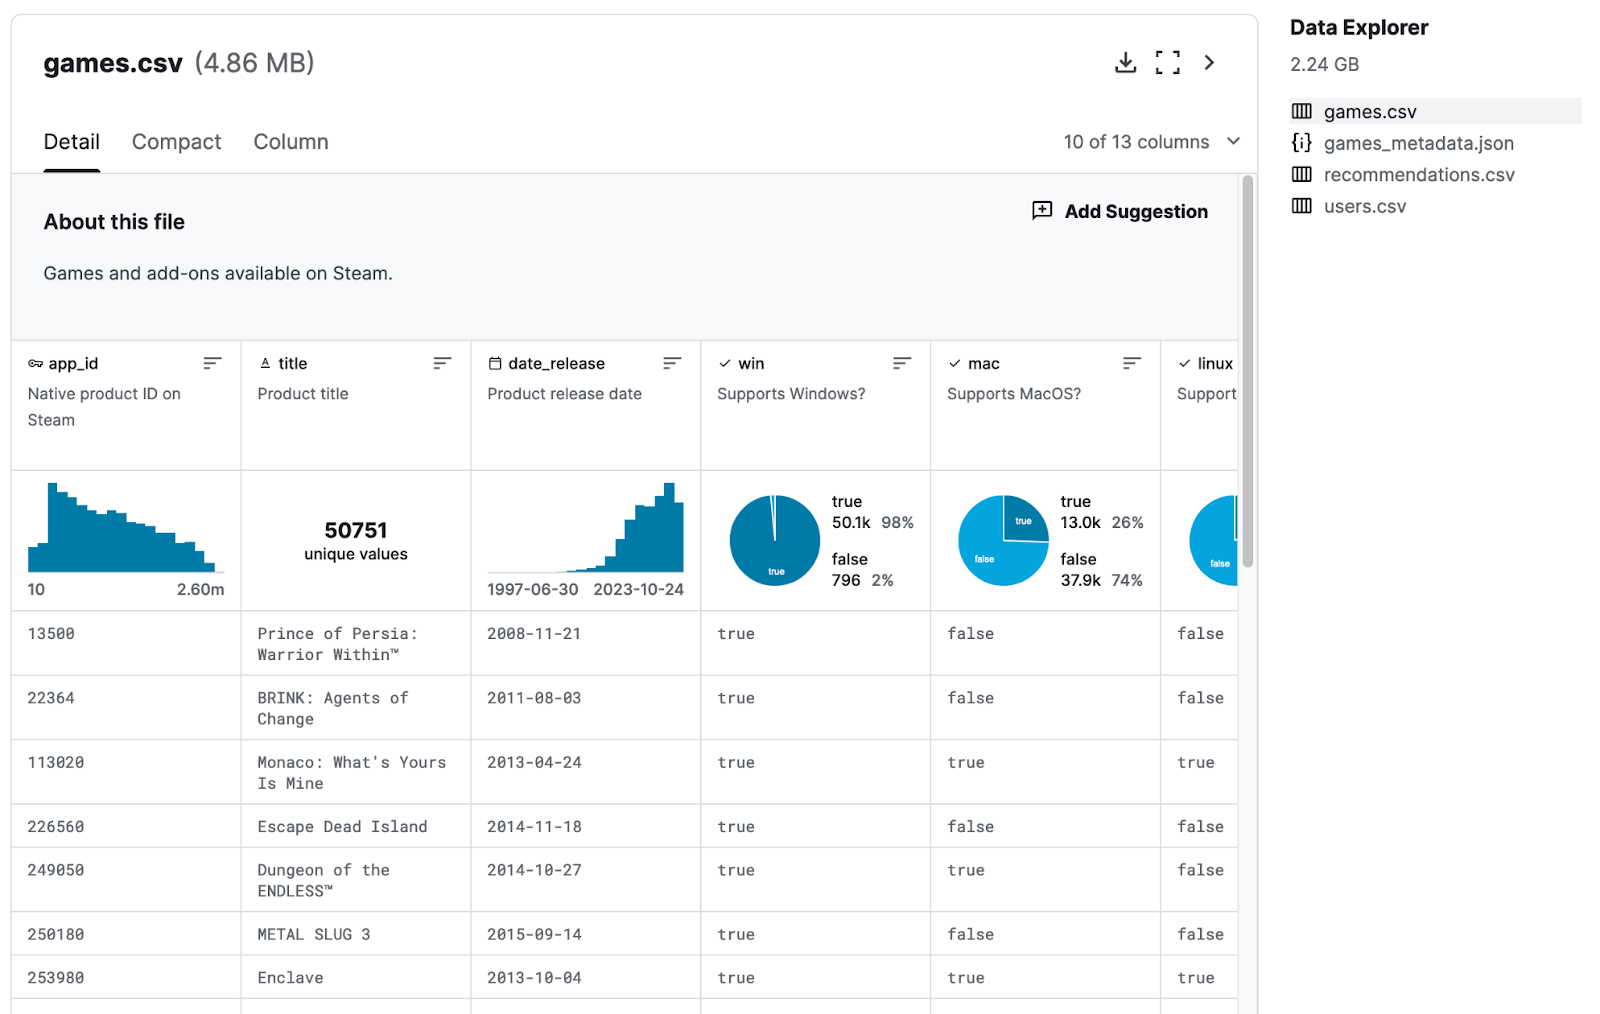
Next, we need to define the table’s schema. This involves identifying the fields and their respective data types based on the information provided on the Kaggle page. Click on the right file from the list, and it will show the following information:
We can convert the above schema with the PySpark StructType:
schema = StructType([
StructField(“app_id”, StringType()),
StructField(“title”, StringType()),
StructField(“date_release”, StringType()),
StructField(“win”, BooleanType()),
StructField(“mac”, BooleanType()),
StructField(“linux”, BooleanType()),
StructField(“rating”, StringType()),
StructField(“positive_ratio”, StringType()),
StructField(“user_reviews”, StringType()),
StructField(“price_final”, StringType()),
])
The next step is to sync the data from the GCP cloud storage.
source_data_files = config(“SOURCE_FILES”)
csv_data = spark.read.csv(source_data_files, header=False, schema=schema, dateFormat=“yyyymmdd”)
We set the data source to the GCP bucket URL, initialise a Spark CSV read stream, and assign it to the variable csv_data.
Next, we must allocate a temporary Cloud Storage bucket to store the BigQuery data result. To accomplish this, we’ll need to create another GCP Cloud Storage bucket, adhering to the steps outlined above, and provide it with a distinctive name.
project_id = concifg(“PROJECT_ID”)
temporary_gcs_bucket = config(“TEMPORARY_GCS_BUCKET”)
It is now the time to create the Bigquery client and set its configuration.
client = bigquery.Client()
dataset_name = config(“DATASET_NAME”)
dataset = bigquery.Dataset(f”{project_id}.{dataset_name}”)
dataset.location = config(“LOCATION”)
dataset.default_table_expiration_ms = 3600000
dataset = client.create_dataset(dataset, exists_ok=True, timeout=90)
Lastly, we can establish a Spark CSV write stream to update the data on the BigQuery cloud:
random_int = randint(1000, 9999)
csv_data.write.format(“bigquery”)\
.option(“temporaryGcsBucket”, temporary_gcs_bucket)\
.option(“dataset”, dataset_name)\
.mode(“overwrite”)\
.save(f”gcp-dataset-{random_int}”)
Notice here we’ve set the mode to “overwrite,” enabling us to replace any existing data in the BigQuery dataset.
The above source code can be found under the DiUS Github repository
After completing all the steps, we can execute the following Python command in the local machine’s terminal:
python gcp-etl-spark.py
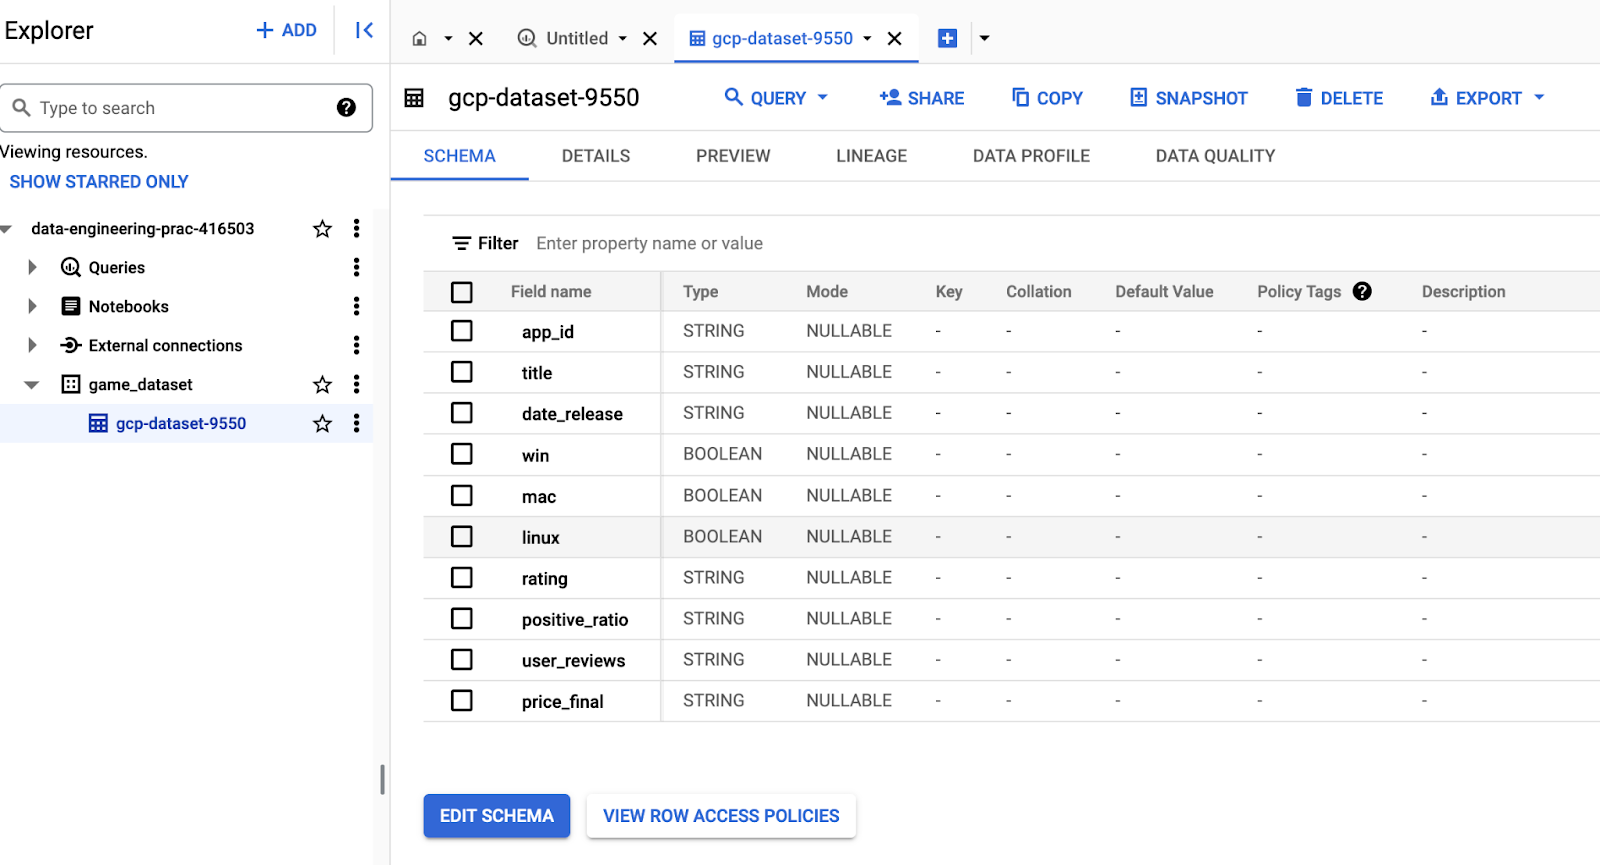
Once the command is completed, we can go to the GCP dashboard to verify the dataset has been added to Bigquery.
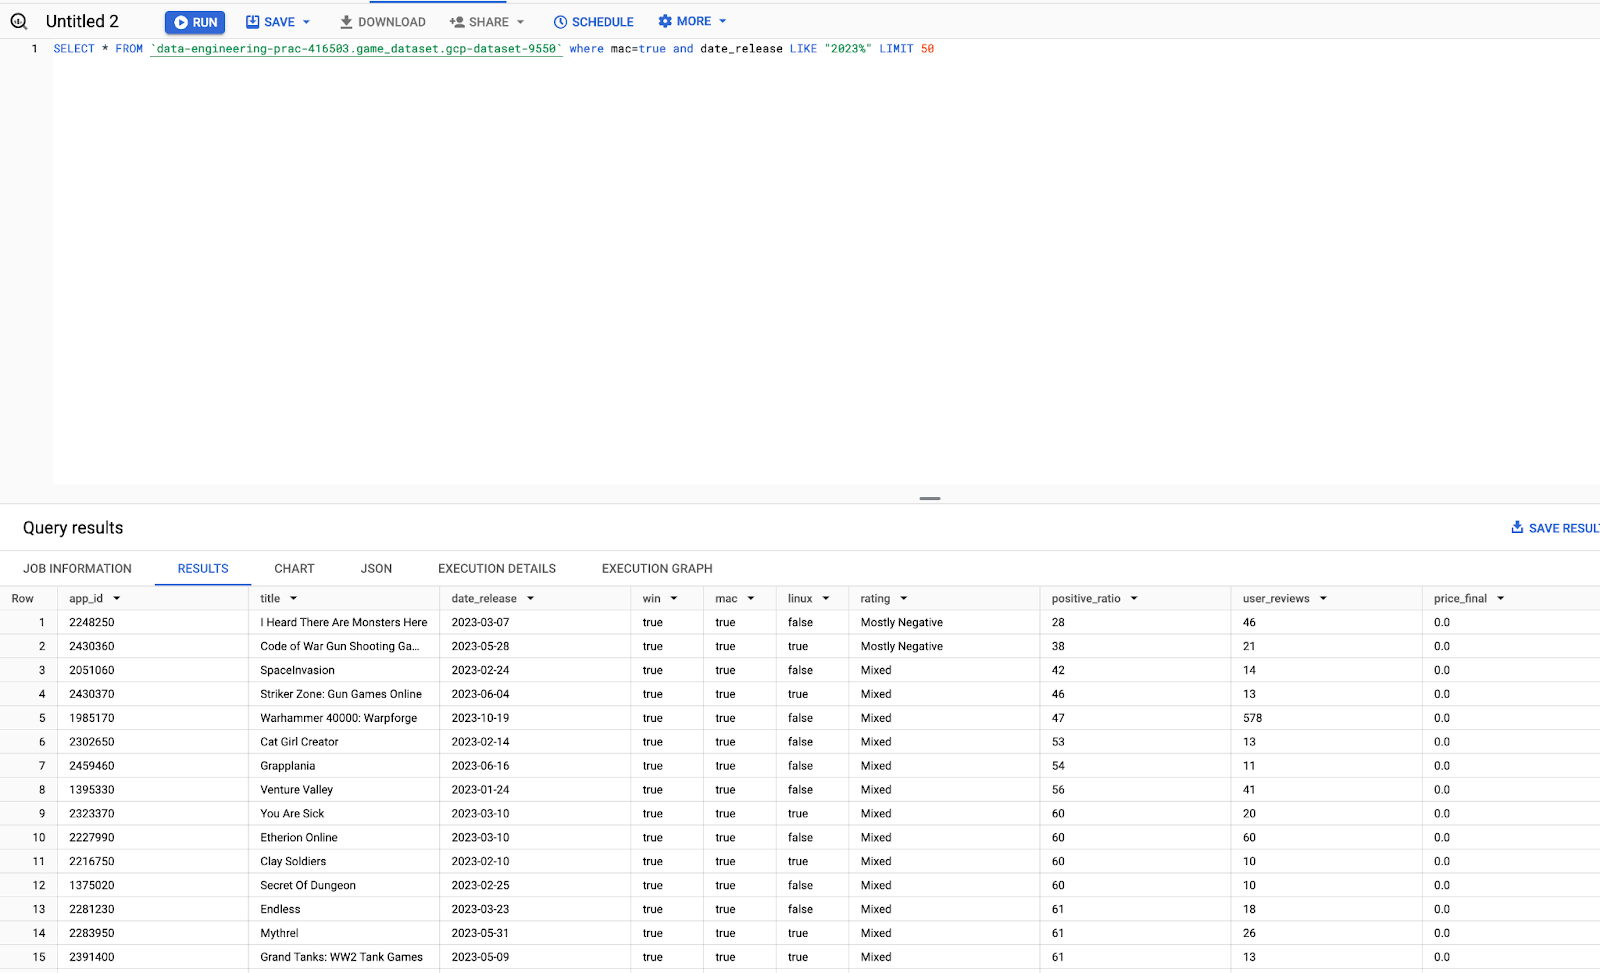
We are also able to run SQL queries to generate the table views and export the result:
GCP Dataproc
Setup cluster
In the previous example, we executed the ETL tasks using local PySpark. However, this approach has limitations. It may encounter memory issues when processing large datasets or take an extended amount of time to complete tasks in cases of poor network conditions. In reality, running PySpark locally is often not practical for most use cases and should primarily be reserved for testing purposes.
A better approach is to handle complex ETL / ELT tasks on the cloud. GCP Dataproc is a managed big data cluster. We can set up a Hadoop or Spark cluster with autoscaling capabilities and various other big data tools on it.
Autoscaling enables us to deploy the cluster with a few worker nodes initially. As demand increases and the existing nodes become insufficient, autoscaling policies kick in, prompting Dataproc to add additional worker nodes dynamically. Once the task is completed, any extra worker nodes created during autoscaling are automatically terminated, incurring no additional charges.
We can configure Dataproc to automatically delete the cluster after a specified period for intermittent processing needs. This way, we control costs and ensure resources are only utilised when necessary.
Firstly, let’s navigate to the GCP dashboard to create two additional buckets:
-
- The first bucket will be used to store the Dataproc cluster logs.
-
- The second bucket will be used to host the Python script for execution by the Dataproc node. We will need to upload our Python script to this bucket once it is created.
Next, we will search for the Dataproc service from the header and create a cluster to process our script. The following steps can be followed:
-
- Click on the CREATE CLUSTER button
-
- Choose Cluster on Compute Engine
-
- In the “Setup Cluster” tab, we can provide a distinct name for the cluster and define its location. At the bottom, we can enable the Component Gateway to utilise the web interface to monitor running jobs.
-
- In the “Configure Nodes” tab, we can select the E2 instance type for both Manager and Worker nodes.
-
- Under the “Customise Cluster” tab, we can enable “Delete after cluster idle time period without submitted jobs” and set it to 1 hour. This configuration ensures that the system automatically deletes the cluster and nodes if they remain idle for 1 hour.
We leave the remaining configurations as default and proceed to click the “Create Cluster” button. It may take a few minutes for the cluster to spin up and become ready for use. When it shows Running on the status, we can hook it up with some jobs to run.

Execute the PySpark script
We must submit a job to run the PySpark task on the newly created Dataproc cluster. Here are the steps to follow:
-
- Click on the cluster name and then the button Submit Job on the top
-
- Assign a unique job ID and select the job type PySpark from the dropdown
-
- Then, choose the PySpark script that has been uploaded to the bucket earlier
-
- We also need to set an additional .jar lib Spark Dataproc Bigquery Connector to run the job on Dataproc. This file can be downloaded from here https://github.com/GoogleCloudDataproc/spark-bigquery-connector/releases
We can download one from the above URL and upload it to the same bucket where the PySpark script is located. Set the cloud storage URL in the configuration.
The whole configuration of the job should be like the following:
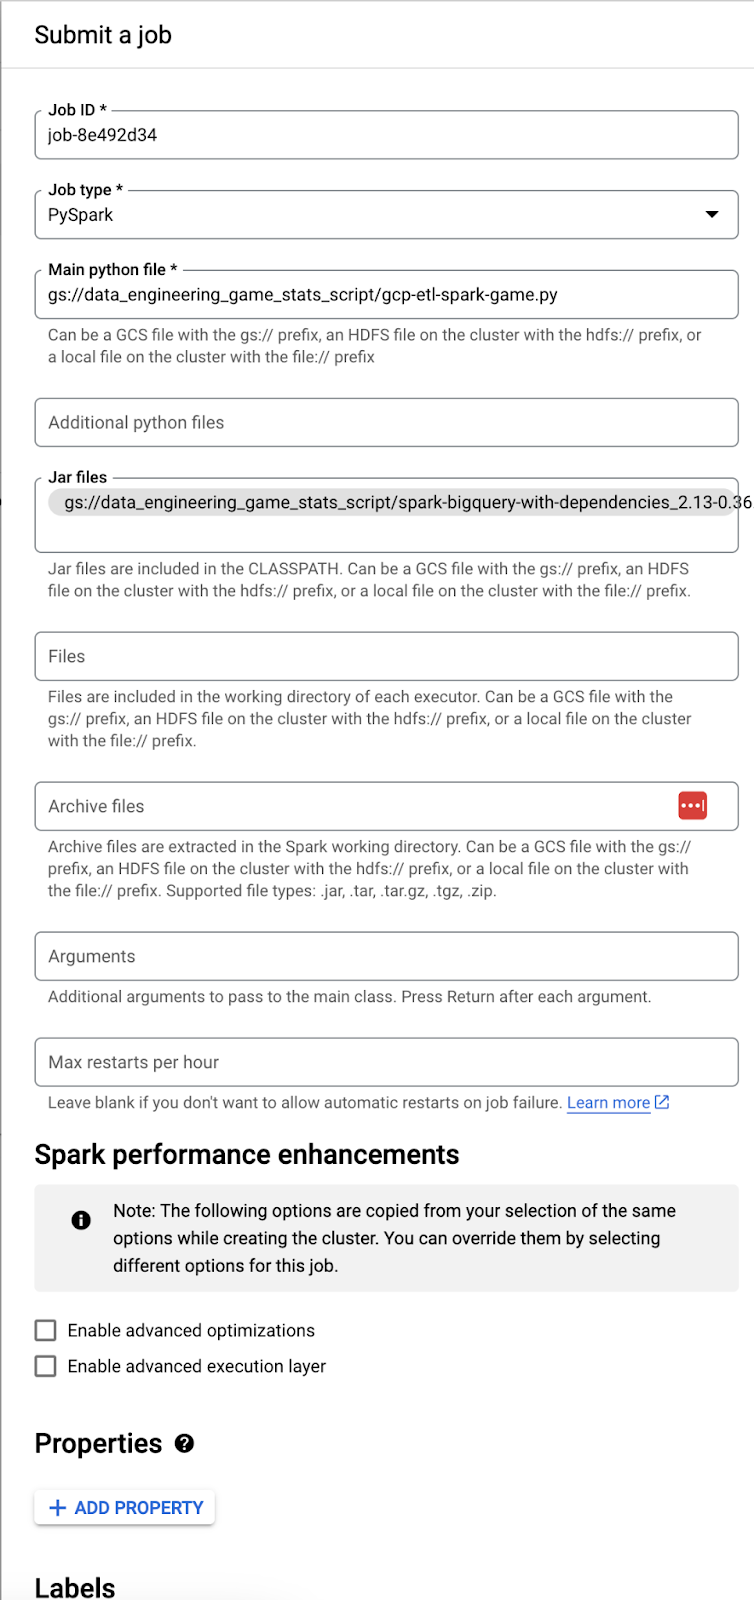
And once the job is submitted, it will automatically be triggered to run. It will take a few minutes to finish, and we can do the same as the manual approach to verify that the Bigquery dataset has been created/updated.
Summary
In this project, we’ve covered the fundamentals of several GCP services, including Compute Engine, Cloud Storage, BigQuery, and Dataproc. Additionally, we’ve delved into basic PySpark tasks, executing ETL jobs both locally and in the cloud. The entire high-level solution is as follows:
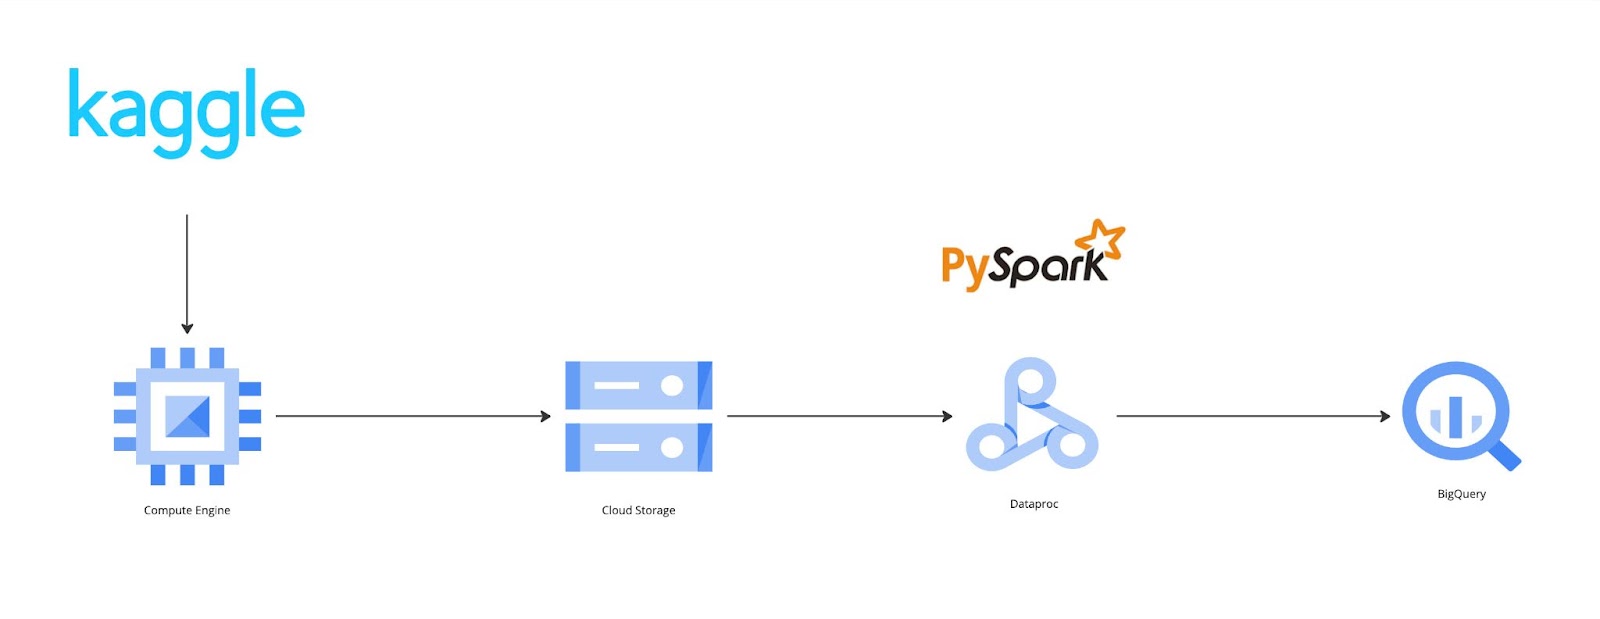
A common scenario for leveraging Dataproc and BigQuery involves processing large datasets stored in BigQuery using Spark. Users can deploy a Dataproc cluster, utilise Spark to analyse the data housed in BigQuery, and subsequently store the results back in BigQuery or another data storage solution for subsequent analysis.
In a real-world scenario, we may need to run multiple jobs sequentially. Dataproc’s Workflows pipeline feature efficiently manages and orchestrates this process.
Moreover, Dataproc seamlessly integrates with other GCP services, such as Cloud Dataflow and Cloud ML Engine. This integration enables users to perform various additional data processing and analysis tasks on the datasets stored in BigQuery. These tasks may include data cleaning, transformation, feature engineering, as well as machine learning model training and deployment.
In essence, leveraging GCP Dataproc and BigQuery in conjunction offers a robust solution for conducting big data processing and analysis tasks in the cloud. It empowers users to effortlessly and effectively handle large datasets stored in BigQuery.
I trust you’re relishing your journey into data engineering now